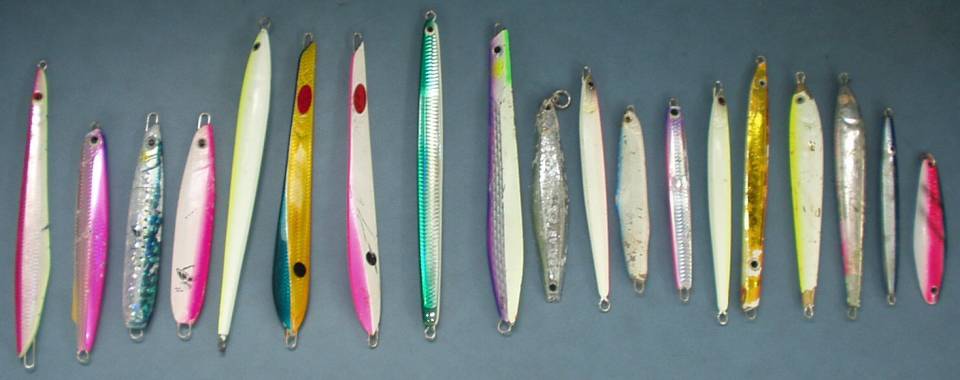
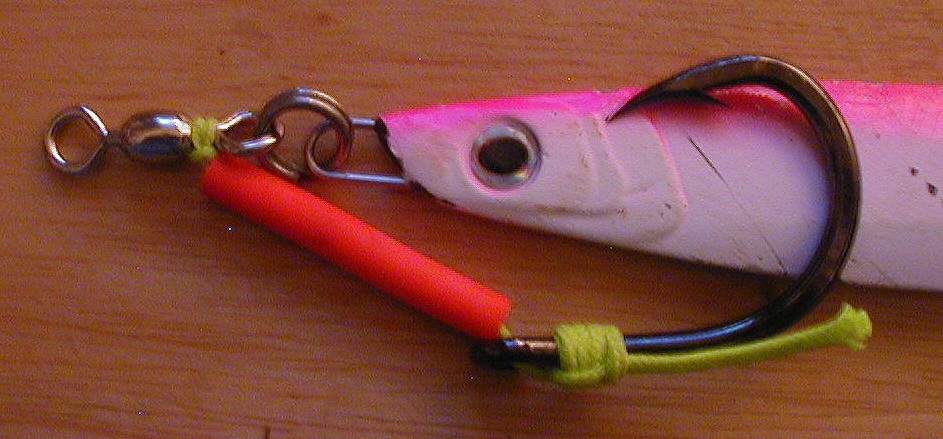
Kona Hawaii jigging & popping

  * Home Page   * Fish Photos Page   * The Boats  
  * Season Calendar  * Links Page  * Videos
  * FAQ  * Kona Fishing Report / Blog   * Hall of Fame   
  * Avoid Sea Sickness    * Share charters
  * Guest Book    * Prices    *email


Deep jigging is a very radical way to catch fish

The development of braided lines have made it possible to use smaller, lighter reels that can now hold several hundred yards of high strength line. I was introduced to jigging in 1997 and commonly use this method to catch a variety of fish. Here in Kona the most common fish to hit the jigs on the ledges are almaco jacks, GT's and amberjacks. Tuna love the jigs too. Another thing with the jigs is that you can come up with some pretty strange catches. Snappers of all kinds but among the strangest things I've caught so far are a big octopus, a world & State record Randall`s snapper and a toothless shark. Deep jigging is a reel workout (pun intended) so it's not for the weak. It's most likely not the style of jigging you do back home. Picture in your mind a 10 to 14 oz. straight dinner knife shaped jig that you jerk up hard on and as quickly as you can, reel down and jerk again. Repeat this movement until you're jig is about 50 yards off of the bottom, let your jig down and repeat that process again and again. The hookup's are AWESOME!

Check out this jigging & casting show we did for Shimano in March 2010.
It's all in Japanese and the jigging action is so fast that it's hard to see but there's lots of fishing action and whales playing next to the boat: Click Here

Here's some jig styles:


Connecting A trapper hook.


Trapper hook(s) are attached to the top of the jigs rather than the old style of putting a treble hook on the bottom of the jig. At first you might think that this wouldn't be as successful as a treble hook on the bottom but after years of using both, I can attest to the fact that the trapper hook definitely has the better hook up ratio. I always use just a single trapper hook. If you attach the hook directly to the jig eye, it will exert the fishes force on the split ring and that can open up on a big fish. Attaching the hook to the bottom of the swivel results in the attachment loop getting chaffed by the split ring edges. Attaching the loop to the swivel the way shown here, actually protects the loop from abrasion. I do it directly off the swivel sometimes too.
The material that I use here to protect the line from chafing is cheep sunglass retainer rubbers. They come in all kinds of colors. I pull the Dacron line through the rubber with the same wire used to make my Dacron loop or a live bait needle.


Tie your own trapper hooks!


First you will need to prepare the line. I got this 130# Hi-Vis dacron from a guy who was stripping the backing off of his reel. Tackle shops often have spool remnants of this stuff for cheep. I Have also used hollow core braided line. The material that you use is up to you. Any woven material with a hollow core will work. Some people have more of a problem with toothy critters than I do here in Hawaii. My dacron does eventually get frayed so I keep a few extra looped lines around and just tie on a new one.
I start with about 20" of hollow core material. A thin piece of stiff wire is doubled and pushed through the hollow core and out the side at about the 1/2 way point. I used the white cap for contrast so you can see the loop of wire. Stick just the tail of the remaining hollow core in the wire loop and now you can pull the wire. The tail will slide through the hollow core and out the other end. Be careful not to pull it so far that you loose your end loop. When you're first learning to do this, it's a good idea to stick something in the loop so you don't loose it.

The first photo is how the hook looks after jigging (and catching) a little. The end of the dacron unravels (with a little help) and becomes a good teaser feather. The knot and wraps on the hook are first shown loosely tied so you can see how it is. When I tie it, I do four tight wraps. Pass the tag end through the end loop as shown. Pull both the tag end and the loop end to tighten. After tying a few you'll see how to make the looped end the right length to match your jig. You cshould always make the tag end long so it's easier to grab and pull everything tight, then cut off the excess tail.


Here's the easiest and best knot to join a shock leader to braided line.

I invented a knot to join monofilament and braided line back in 1999 that I called the Dog Knot and it was published in the March 2000 issue of Sport Fishing Magazine. Although their illustrator for the magazine drew my knot wrong, the description on how to tie it got some people through the process. But, Like most knots, the strength of the knot totally depends on how the wraps laid down. If it doesn't synch together right, the strength of the knot is lost. The Kona jig knot doesn't have that problem so I don't even tied my own knot any more. I have been tying this knot for many years now. You can depend on this knot holding! It's a real simple one and lays down easy. Take my word for it.

You will need to tie a bimini twist in your braided line to double it. There is a quick and easy was to Tie the bimini twist too, even while in rough seas and I hope to add a video of tying it to this page when I get time and equipment to do it. The yellow rope represents the doubled braided line. The white rope represents the leader.

Hold the doubled line and leader with your left hand where the glove is (never mind it's a right handed glove). Make 4 wraps around both lines with the doubled braid and then pass the end of the leader through the end loop of the braided line.

Pull the braided line tight onto the leader. This is easily done with your rod in a boat rod holder and grabbing the leader in front and behind the knot and just pulling. Sometimes I pinch and roll the know between my fingers to help it lay down tighter.

Tie a 2 or 3 wrap Uni knot in the leader (depending on the thickness of your leader) and pull it fairly tight.

Pull both knots together. The trick is to hold the tag end of the leader and the double line tight together and paralell., then trim the tag of the leader of course. This makes the end of the leader point parallel to the doubled braid. This knot goes through the guides easy so it's a great knot for casting plugs too!


Penn 9500 reel modification

Jigging puts a lot of punishment on a reel. As a charter captain, I took 100's of jiggers out fishing and saw all kinds of reel failures. The Shimano Stella 10000 spinning reels were the best for the job at that time but way out of my price range. The Penn 9500 looked like it would make a good jigging reel with the improved drag system and a reasonable price. It didn't take long for my new 9500 to fail The problem was the anti-reverse system. Mostly it failed because either the silent anti-reverse dog screw or the rotor nut would vibrate loose. You could also engage a 2nd anti-reverse dog but this other dog is spring loaded and makes a lot of noise while jigging. Here's the solution to the problem: Here's the stock Penn 9500 spinning reel guts.

Remove the large lever on the right. You won't need this anymore. Remove the spring loaded anti-reverse lever (top). Throw away the spring, you won't need it anymore either but Install the old spring loaded lever where the large lever was. It is very important that you use the screw from the large lever to install it. Make sure you put the screws back in the same holes they came out of! Install a new silent anti-reverse dog in the position where you removed the spring loaded one. The old spring loaded lever now acts as a limit stop for the new silent dog. Here's what the new assembly looks like:

Here's the most important step of the whole process. Make sure you use Loc-Tite (red) on both silent dog lever screws, limit stop and the rotor nut. If not, it will all vibrate loose and fail anyway. Even if you don't do the modification, Loc-Tite will help keep the stock reel from failing too soon but hey, this mod. is good and simple and cheap. Make sure that both silent dogs move freely. Excess Loc-Tite can prevent the silent dogs from moving freely and defeat the whole purpose! I'm currently using two of the newer Penn 950ssm reels for jigging rather than my modified 9500's. No antireverse failures and very smooth but I keep snapping off the stock handles. Penn has sent me newer style handles and I haven't been able to break them off yet.


Here's another spinning reel modification.

A two handled spinning reel? This wasn't my idea but I guess I perfected it. I had three guys out jigging for 4 days. By day three and after a lot of fish the guys were obviously getting tired and weak. One guy hooks up to a nice one and the arm he was using to lift his rod just wouldn't work anymore. He asked one of the other anglers to remove the handle from his identical Stella 10000 spinning reel and screw it into the other side of the one he was using. It was done in quick time and with a handle now installed on both sides, the angler was able to now lift the rod and fight the fish by switching arms. The next day, all three anglers showed up at the boat with two handles installed on their Stella spinning reels. This was done in bicycle fashion and seemed a bit awkward but the guys were able to keep jigging on day 4 and didn't even miss a stroke while switching arms. I read the IGFA rules and found that two handles on a reel are indeed legal as long as their not designed to be used simultaneously. This gave me the idea to match the handles together like this:

I had to buy an extra handle, cover plate with the hole in it and a felt. I got some shims with the right diameter at the local hardware store. I've done 3 of these reels now and each time I only had to shim one side with one or two shims. While it makes extended periods of jigging and fighting fish much easier I did find one problem. The problem is, if you smack the free spinning handle, the handle not in use, on anything (like the side of the boat) it will knock the free handle loose. Continued turning will unscrew the unused handle and it will fall off. Usually into the water rather than on the deck.


This page is a work in progress. More good stuff later


[ Home]   [ Fish Photos Page ]   [ Hall of Fame Page ]   [ Reviews / Guest Book ]

  [ The Boats ]    [ Kona fishing report / Blog ]   [ Links Page ]   [ Avoid Sea Sickness ]

  Frequently asked Questions - FAQ ]   [ Videos ]   [ Season Calendar ]  [ catch stats ]   [ Prices ]   [ email ]